Measure Marketing Campaign ROI in 2024

Calculating marketing campaign ROI in 2024 is simple.

Measuring marketing campaign ROI in 2024 is supremely difficult.

Maximizing marketing campaign ROI in 2024 is the worthiest of goals.

I riffed on this while helping out a fellow marketer who posed this question on Quora. Here I’ll go into more detail.

Defining ROI

ROI is a simple ratio of two numbers:

profit from an investment divided by the cost of that investment.

Measuring the cost, investment and profit numbers mentioned above is what makes this hard.


Measuring The Inputs to Marketing Campaign ROI

Let’s start with costs of a marketing campaign. There are the direct costs, for example media buys. But there are lots of indirect costs: labor to create the campaign, sales effort to manage the account and win the deal are examples. And what if a buyer responds to 3 different marketing campaigns before purchasing? Which campaign gets the “profit” credit (this is a complex topic of its own called marketing attribution). And then frequently marketing spend has impact, but can’t be directly traced back to a particular campaign or tactic.

Now onto investments. This one is even more fraught with nuance. How do you allocate costs like brand value, website maintenance, a global dealer network.

And finally profit. Are any marketing campaigns profitable in their own right? Not directly. It takes a company to satisfy a customer need and for profits to appear on a P&L statement.

Am I going to throw my hands up and walk away from measuring marketing impact or ROI? No way!

It is important to measure the economic impact of marketing. Measurement and calculation of each experiment can be normalized and compared. And when compared, interesting trends that can improve future campaign performance (in other words, ROI improvement) appear.

Towards Usable Marketing Campaign ROI Metrics

Each marketing tactic is measurable in many ways:

  • Cycle time (from idea to execution)
  • Direct costs
  • Number of impressions
  • Number of conversions
  • Differential outcomes (A/B test results)

There’s more, but let me move on.

If you have a set of hard numbers for each campaign you run and then run 30 variants of campaigns all targeting your desired “conversion outcome”, you can get some interesting performance metrics around Direct Costs and Outcomes (conversions or purchases).

The job of each campaign manager on the team is to maximize the results from the campaigns they run and to improve the productivity of the spend under their direction.

ROI Improvement As A Marketing Productivity Metric

Let me drill into improving productivity. Say you are an email marketer. You have campaigns targeting C-level executives, Buyers and Developers. You should report on the performance of each segment and make assertions about marginal improvements for future campaigns targeting those segments.

Say you’re an event marketer and you attended 3 trade shows that quarter. You should be able to rank the performance of each audience/region/industry targeted, and use that information to make plans for future quarters and to inform the CMO-level investments in industry penetration and brand spend.

My belief is you should calculate the direct cost ROI of every campaign: ads, trade shows, emails, telemarketing. The goal of a marketing campaign manager is to both grow the number of conversions and do whats possible to get more in-target conversions at lower marginal cost. So that’s how you use ROI in marketing. Not to solve the problem of the ages, but to make the process more productive with each turn of the crank. That’s how you maximize marketing campaign ROI.

One Last Thing: Statistical Significance

One caveat to what I’ve stated above: statistically valid sample sizes. Typically campaigns focus on reasonably small segments and short timeframes. Be careful about making strategic changes with only a few data points. Be familiar with the way conversions are trending and devise experiments and execute improvements towards gaining more conversions. Share your data with managers and executive along with your recommendations about what to try next. Give your executives the information they need to plan for the future as you march toward statistically valid and data-driven decision-making.

Should You Use .svg Images in WordPress Posts?

Graphics make blog posts and web pages better. A picture is worth a thousand words—but including pictures on the web is harder than it should be. There is a whole alphabet soup of formats, graphic features such as transparency, different resolutions and the dreaded browser compatibility, find out more at this Kinsta blog post. Wouldn’t it be nice if creating and publishing graphics was as straight-forward as publishing text?

New and Improved: .svg or Scalable Vector Graphics

.svg images WordPress

.svg images in WordPress are here! This is the official .svg logo (in .svg format) served up from this blog’s media library using the Safe SVG plugin.

I’ve been tracking .svg for some time. .svg format stands for “scalable vector graphic,” which is described in a W3C specification. The format provides a modularized language for describing two-dimensional vector and mixed vector/raster images.

As of February 2017, .svg delivers numerous advantages for designers and developers alike. .svg images are supported by most browsers. The files are tiny compared to it’s .png and .jpeg brethren. And there are multiple tools, including my favorite graphic design tool, Sketch 3, that save files to the .svg format.

The advantages of .svg come from an industry standard format that comprises (1) vector graphic shapes (e.g., paths consisting of straight lines and curves), (2) raster images and (3) text that display beautifully in all modern browsers. In other words, the .svg image file contains instructions for rendering images at any resolution rather than compressed rasters. And for the designer and webmaster, this means you have a single tiny file to manage rather than exporting 1x, 2x and 4x versions from a graphic tool which need to be managed in a CDN or media library and delivered to desktop, mobile and retina displays based on the viewport setting…very, very complex.

With the advantages of broad compatibility, tiny files and simplicity, it’s time to make a switch. Or is it?

.svg Images in WordPress…Not For the Masses…Not Yet

As of February 2017, WordPress doesn’t officially support .SVG images. Sure it’s easy to enable SVG in your WordPress instance through a function or a plugin. But if it’s easy to support the .svg image format, why isn’t support included in WordPress core?  The answer: security.

It turns out that the .svg format is more of a document format than an image format. That means you can embed all sorts of things in a .svg file. This includes JavaScript. So that seemingly benign graphic could easily contain a not-so-benign script that hijacks visitors, data and web experiences. Not so good. And with 25% of the web running on WordPress, the core development team prioritizes security and reliability over simplicity. The four years of engineering debate is visible to all in WordPress Trac ticket 24251.

.svg Images in Controlled WordPress Sites: Bring On .svg!

In sites where only skilled web designers and publishers with a strict file chain of custody procedure, the advantages of .svg can be realized today. For security, I strongly recommend that you think twice about deploying .svg support by hacking the functions.php file and or using the less secure plugins that you can easily find in the WordPress Plugin Directory.

Instead, focus first on training and procedures to mitigate potential risks from .svg. Just as you wouldn’t let anybody upload JavaScript to your site, you shouldn’t let just anyone upload .svg files to your site. The first and safest approach is to let savvy designers include .svg files in theme assets:

  1. Produce your own .svg files or review code in files provided by others
  2. Run the .svg file through a sanitizer, like DOMpurify
  3. Save the resulting code locally.
  4. Add the .svg file to your CDN or production file system
  5. Directly reference the sanitized file with CSS or HTML code <img src="/blah/file.svg" />

How About Media Libraries?

Enabling the media library opens more risk. If you are ready to limit access to the media libary using WordPress user roles, the risks should be manageable. There is one .svg plugin I can recommend today: Safe SVG by Daryll Doyle. It not only enables the .svg mime type for the media library, but it sanitizes .svg files on upload. The plugin is young but works. And developer Daryll Doyle is actively developing Safe SVG. He deserves our support!

.svg has a bright future for web publishers who value great user experiences with content and compatible graphics files that are simple to manage. Let’s embrace a secure future for SVG and WordPress.

Create Web Content That Gets Noticed With These 5 Tools

We all know that content management systems makes it fast and easy to publish to the web. Fast and easy, however, isn’t the same as optimal. Optimal is harder to achieve—and squishier to define. On the web it means you have to think about multiple variables: your audience, text, images, search engines, standards, guidelines, technology and a lot more, since there are different options for this purpose, from using websites to market your products to other strategies like send text message online to promote your products or services.

Your reader comes first. Period.

This should be obvious. You are publishing content for your audience. You are trying to inform, educate, persuade and amuse your audience. But when traffic or ranking on search engines is lower than you’d like, it’s tempting to make changes that negatively impact your audience in the hope of a short term traffic boost. My advice: don’t do it. Earning a loyal audience and avoiding penalties are two good reasons to take the high road. Concentrate on creating good content that keeps your audience engaged, opt to use AI content writer like Copymatic.ai to personalize your content even more.

Earning a loyal audience

If you’re like most web site owners, you want the audience to visit more than one page. Perhaps you want them to buy something or register for update or browse other content on your site or return again in the future. That first visit is your chance to earn trust and loyalty. If you think it’s hard to get somebody to your site, just wait until you learn how hard it is to keep them on your site or to convert from an anonymous visitor into a potential customer. Yes you need to get people to your site, but success requires planning for a journey, not just a single step.

Avoiding search engine penalties

Search engines have the power to reward and to punish publishers. Remember, they’re competing for users and trust just like you are. The are continuously tweaking and improving algorithms to present the best and most relevant information to users with each and every search. So when a page or an entire site is employing tactics that inflate the relevance of your content, you may get a short term improvement in your rankings and visits.

Users and search engines are smart. Users will abandon pages with weak content (called pogo-sticking). Search engines will take notice of sketchy practices and issue algorithmic or manual penalties. If your site relies on search engine traffic for revenue, getting penalized will be very painful. Future traffic could drop by 20% or more. And even after you clean up the user un-friendly tactics, it will take weeks or months to regain the trust of a scorned search engine vendor.  Those are significant costs and effective deterrents for mainstream site owners.

The flip side of penalties are rewards.  Following Quality Guidelines will not only let your avoid penalties, it will reward you with engaged readers and higher rankings in search engine results pages. Surprisingly few people have read Google’s quality guidelines. Fewer have put them into action. And even fewer still embrace these guidelines consistently across their site and content. That is your opportunity. Below are five tools that help authors succeed at publishing content that gets noticed by readers and search engines alike.

The more visitors to your site, the more of them you can eventually hope to convert to paying customers. SEO tends to be one of the best-converting traffic channels, because it relies on pulling in actively interested people instead of trying to capture their attention with paid ads. Partnering with an seo agency manchester also ensures you’ll know how to handle unexpected changes, like algorithm updates or even penalties. SEO agencies  have experienced these many times before, and can guide you through each potential issue smoothly and quickly. You may also attend an Internet Marketing Conference to learn more about effective digital marketing strategies.

As your financial services company starts showing up for more searches, more people will become aware of it, use different software or apps for finances, the seamless payroll operations system will be an improvement for your business. Soon, they’ll be associating your brand with being a major player in the field of finance. In time, if your on-site content truly delivers what they’re looking for, you’ll also strengthen your brand credibility by positioning yourself as a reliable expert.

5 Tools for creating irresistible content that gets noticed

Below are several of my favorite tools that help you create elated and sticky users and sites that are easy for search engines to crawl, parse, index and rank highly in search results. These tools focus on “on-page optimizations” which means that each page you create is ready for consumption by readers and search engines. “Off page optimization tools” which focus on building site-wide credibility and links are beyond the scope of this article. All of the recommended on-page optimization tools have free versions. Some have extremely useful professional editions that are worth evaluating.

1. Yoast SEO

Yoast SEO is an excellent plug-in for WordPress and Drupal that helps authors follow on-page search engine optimization best practices.
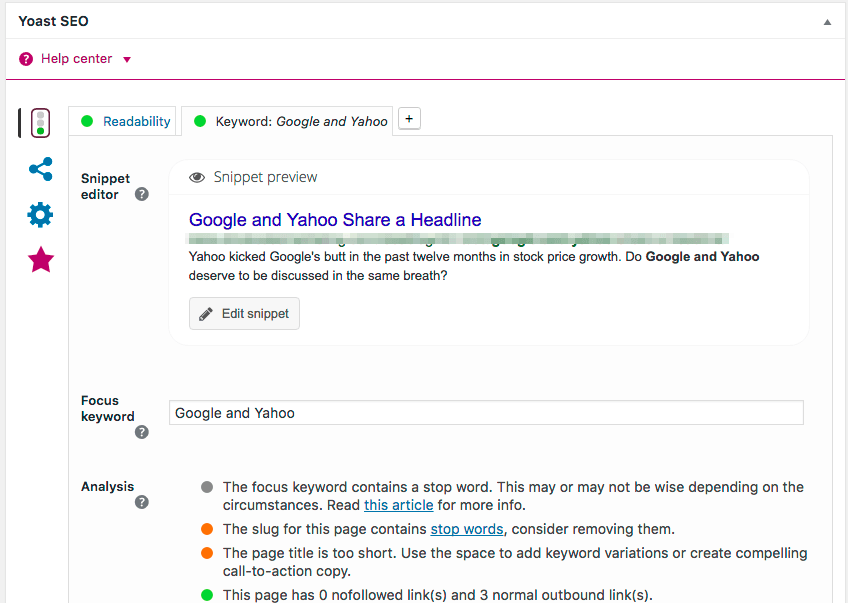
Get Noticed: Yoast SEO

Incorporating this tool into the writing/editing/publishing workflow is super easy for everyone from authors to content strategists, blog editors and WordPress administrators. Use this tool before publishing posts to validate that the content is set up for success across multiple dimensions. Yoast SEO uses the idea of a “focus keyword” as an organizing principal. It then provides guidance to authors for improving the content for robotic search engines crawlers such as increasing article length, incorporating useful hyperlinks and subheadings and crafting optimized meta descriptions. Now it’s even better because of 2016 improvements for post readability. Yoast SEO provides helpful and light-handed readability suggestions by scanning your content for long sentences, passive voice and use of transition words.

Yoast SEO also does a ton behind the scenes optimizations too. Webmaster best practices such as maintaining sitemap.xml and robots.txt files happen without direct intervention from authors, editors, administrators or theme designers.

2. ImageOptim

ImageOptim is a free and open source MacOS app that strips images of extra pixels and unneeded meta data. This is extremely important because photographs, stock images and even images created in tools like Photoshop include a lot of information that isn’t needed by image consumers. Extra information results in bloated files that download slowly. The result is small image files that render beautifully and transfer across the internet quickly.

Get Noticed: ImageOptim

Adding ImageOptim to your workflow is super simple. Once you’ve downloaded and install the app, add the icon to your Mac’s dock. Before adding new images to your post, drag it onto the docked icon. The reduced-size file replaces the original. Lossy compression is a available as a user preference if you want to reduce file size even further.

3. Web Developer Extension for Chrome

Web Developer is a Swiss Army Knife of web development tools used by just about every experienced web developer and publisher—and you should start using it too. Your initial focus should be on using the extension to run validation tests using the W3C validation engines for your HTML and CSS code plus any links that are on your page.

Get Noticed: Web Developer for Chrome

Many HTML and CSS errors are benign. Others cause pages to render poorly. Poorly formatted pages discourage users and diminish trust. The same is true of hyperlinks. Nothing frustrates a visitor more than clicking on a link and not getting the desired payload.

4. SEOQuake Browser Extension for Chrome

SEOQuake presents a consolidated audit of SEO metrics and ranking factors for published pages.
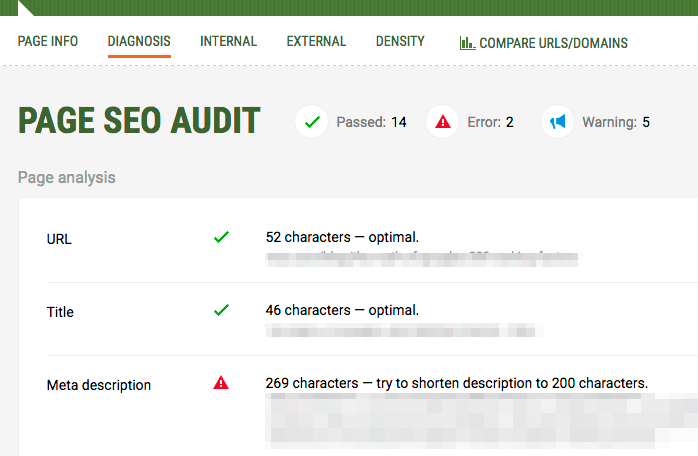
Get Noticed: SEOQuake

It gives you information about how easy your pages are to be indexed along with useful information on effective keywords. Not only does SEOQuake help you evaluate your own site and pages, but it’s highly useful for evaluating how effective your competitors are at creating irresistible pages.

5. Google PageSpeed Insights

Google PageSpeed Insights is a web application focused on the all-important page load time. You provide it with a URL and it identifies fixable elements on your pages for improving performance on desktop and mobile devices. Research studies suggest that in 2016 users prefer pages to load on any device in 3 seconds or fewer and that pages that take more than 5 seconds to load risk abandonment. What’s more, Google uses page load time as a ranking factor.
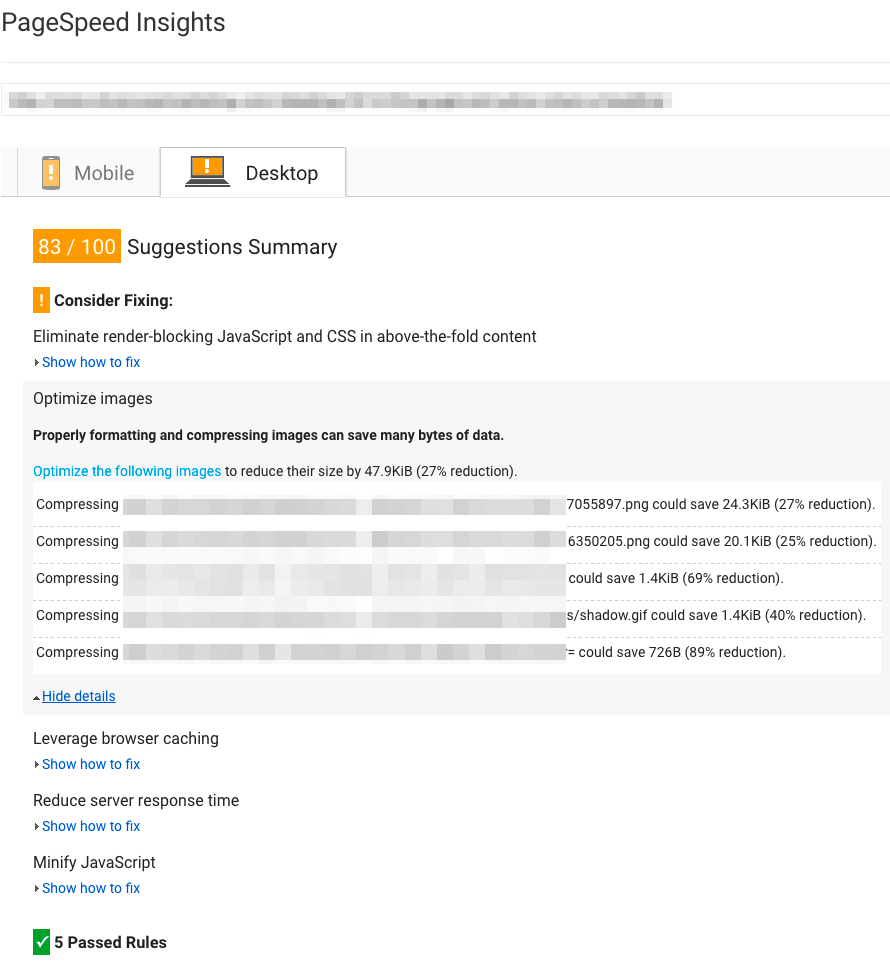
Get Noticed: PageSpeed Insights

The tool presents a numeric score for your pages, but the real value is in the detail. Drill in to learn where PageSpeed bottlenecks are and how to fix them. The report is a gold mine of issues that are generally easy for authors to fix, like compressing images with ImageOptim.

There’s a lot more you can do but I strongly recommend start with a “high road” philosophy and this initial set of tools. Take the time to learn their features. Figure out how to incorporate the tools into your publishing workflow. And, when you have a few moments, you should also run these tools on previously published pages.

Demand Generation Best Practices Aren’t About Digging Deeper

It’s 2016 and the current debate about marketing tactics in Silicon Valley resembles the tactics for farming crops in the increasingly parched San Joaquin Valley. Let me rant a little and explain.

I just got out of a long meeting. A meeting that many marketers have every quarter. The topic: what campaigns and spend levels do we need to hit this quarter’s lead quota. These meetings are incredibly important, but today’s meeting turned in a less useful direction when the focus switched to which tactical “best practices”  to use in the upcoming quarter.

digging deeper wells

Photo Source: Rakshith M Gowda. Shared via Creative Commons Attribution-Share Alike 4.0 International

This unfortunate turn in a marketing meeting led me to draw an analogy with California’s current, and historic, drought.

“Digging Deeper Wells” Isn’t a Marketing Best Practice

With California farmers not getting enough surface water for their thirsty crops, they’ve turned to digging wells. Farming, you see, has exactly two sources of water: surface water (rain, reservoirs and snow melt) and ground water (digging wells). They can’t control rain, but they can invest in wells. So they dig. 20 years ago they might have dug a few hundred feet. Today they are digging a few thousand feet. And so goes the discussion amongst farmers: tactics, timing, ROI and viability of digging deeper wells.

The “digging deeper wells” analogy is relevant to marketing spending because fresh leads are getting tougher and tougher to find. Organic—the surface water of B2B marketing—is the preferred source of leads, but few organizations generate enough organic leads to meet their growth objectives. So they hire marketers and allocate budgets for lead generation. The ask: create the campaign equivalent of digging well water. The budget is set by how deep the hole needs to be to hit water.

Herein lies the problem. Instead of building demand generation engines based on innovation, many marketers simply recycle and reuse demand generation tactics from the recent past: purchase yet another compiled email list, send yet another nurture email to the marketing database, launch yet another Google AdWords campaign, host yet another webinar, and set up yet another gated white paper. Yes, these tactics continue to work. But they are no where near as efficient in 2016 as they were in 2009.

Demand Generation Best Practices: Build for the Future Instead of Replicating the Past

Unlike the exactly two options available to farmers seeking water for their crops, marketers have nearly unlimited options for building future-oriented demand generation success. As a professional marketer my value is from strategizing, executing and measuring demand generation programs that are relevant to today’s target buyers and that will likely out-perform tactics from five years ago.

So instead of just re-allocating larger spends across traditional SEM and content tactics, I suggest marketers build fresh new plans based on projections for the competitive climate, projected company differentiation and latest assessment of target buyers. In other words, instead of defaulting to digging deeper wells, it is very possible for B2B marketers to find fresh sources of water by looking for buyers in fresh locations. Here are a few suggestions:

  • Revisit your target personas, segments and use cases—does your recent product release have new differentiated features or appeal to new buyers? Can you re-segment your existing database? Can you find new and different target lists? Tap into the green fields with your new campaigns.
  • Partner with sales on a target account strategy—here’s an opportunity to proactively reach out to your sales team: offer to provide augmented contact info for, say, five specific job titles at a handful of target accounts. To benefit from this offer, each representative needs to provide the specific account names for research. And together you are building personalized emails and talk tracks to earn meetings and win deals.
  • Find fertile activity patterns in web visitor behavior—still using point based lead scoring? Stop. It never worked and there are better approaches like predictive lead scoring. Even if you can’t invest in fancy predictive lead scoring solutions this quarter, you can start doing the analysis toward identifying sales-ready buyers. Explore the behavior of every user with > 5 visits in the past 90 days. Explore the behavior of every user who has an email address associated with a forecasted deal. Build charts of the findings, share the details with your extended go-to-market-team … and start using those findings to define sales-readiness.
  • Look for “first time” events and partnerships—think you have to be at the largest trade show in your industry with a major presence? Don’t make this an either-or decision. The cost of participation in hyper-targeted shows will be less that for the mega-events, and you’ll have less competition for buyers’ eyes.
  • Switch it up with your pre-paid channels—you probably have an existing multi-quarter media buy in place. How about making experimental changes to your ads, landing pages and assets and perhaps even the target audience within the publishers’ site/publication portfolio.

These are just a few of the ways you can get away from drilling deeper wells and the associated diminishing returns. There are many, many, many others.

Embrace Strategic Demand Generation Best Practices

The best practices from five years ago aren’t the campaign tactics. It’s the relentless focus on relevance, measurement and data. As you move forward apply what you’ve learned from:

Predictive analytics brings data to marketing decision-making.

Predictive analytics enhances marketing decision-making.

  • Being relevant, helpful and targeted—are you still promoting that allegedly evergreen white paper from 2014? If the content is still good, make it great with a modest refresh. Update the trend data, add fresh quotes from customers and analysts, insert new use cases and correct your boilerplate. Even evergreen content needs a bit of pruning and fertilizer. If the people in your marketing database trust you, they’ll quickly jump at an updated white paper from you—which is yet another reason to reopen a dialog. And new prospects will reach out for the new and timely information you’re providing.
  • Measuring everything—if you’ve set up your infrastructure correctly, this is free. You’ll be able to compare different channels, classes of offers and campaigns against your benchmarks. Once you have a meaningful engagement sample, you can compare new programs against historical success.
  • Listening to your data … and customers—in 2016, data has earned a seat at the table for campaign success decision-making. Bring it to your meetings. Discuss what it means. And absolutely use data to challenge ingrained assumptions on the team. If you don’t have a large enough sample size for statistically significant findings, bring qualitative feedback (from prospects, buyers and customers, not employees) on the utility of the campaign asset.
  • Taking smart risks—don’t be afraid if a great campaign effort doesn’t generate lots and lots of leads. Reduce risk from any single campaign by having a portfolio of campaigns running concurrently. That way every campaign is a success if you have data for improving decisions about future campaigns. With multiple campaigns you can act like a portfolio manager and not a water-hungry farmer: cancel the clearly ineffective campaigns quickly, double-down on the clearly effective campaigns, and iterate and improve those that have unfulfilled potential.

In summary, the best practices from the digital era are a refreshed point of view on campaign strategy, more than deeper reliance on going back to the well with specific campaign tactics.

What Do You Think?

Look at your plan for next quarter. Do you stand a better chance of winning by writing your own 2016 playbook or following legacy demand generation best practice of digging deeper wells?


Affiliate Marketing for B2B Publishers

It’s time to shake it up again at “Bill Freedman’s Soon to be a Major Trend.” I’m going to start experimenting with Affiliate Marketing links. In this post we’ll take a look at the Affiliate Marketing players, the transactions and the industry dynamics. And we’ll explore my first foray into Affiliate Marketing featuring DreamHost, my web hosting provider for over a decade.

The main purpose of this web site is to share perspectives on B2B marketing. But it’s also a site where I experiment with new technologies and tactics. Experimenting with Affiliate Marketing is consistent with the blog’s charter, so let’s dig in!

What is Affiliate Marketing?

Affiliate Marketing is hardly a new topic, but it is new to this site and is easy Understanding data with machine learning. It is a form of performance marketing that rewards “affiliates” for promoting third-party products to their audience.

Let’s dig deeper, starting with the cast of characters in a web-based affiliate marketing program and then digging into the transaction details.

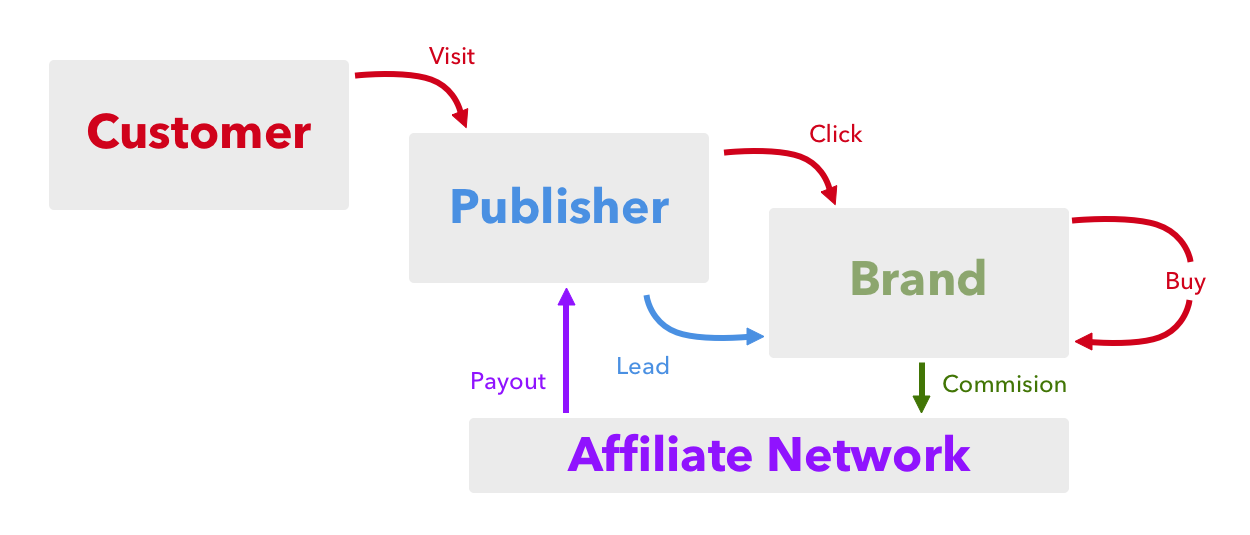
The Affiliate Marketing Cast of Characters

  • Brand – This is the organization that provides rewards in exchange for sourcing new customers
  • Publisher – This is “the affiliate” or organization that publishes and promotes links to the brand’s web site and purchasable products
  • Customer – The is the publisher’s audience who ultimately buy products on the Brand’s web site.
  • Affiliate Network – The Affiliate Network acts as a broker between the Brand and Publisher. It provides infrastructure and services like account portals, metrics, links, etc. that make it easier for brands to attract Publishers, and for Publishers to share affiliate offers on behalf of the Brand. Amazon Associates is an example of an Affiliate Network.

The Affiliate Marketing Transaction Flow

The actions taken by the Customer, Publisher, Brand and Affiliate Network are outlined in the diagram below.

affiliate marketing transaction flow

Affiliate marketing transaction flow.

The Publisher attracts Customers to their web site, typically through valuable content. Only when the Customer buys a product does the affiliate marketing transaction flow take effect. Affiliate marketing programs rarely compensate for impressions or even clicks. As a result, the Publisher is typically rewarded in the form of high Commissions for Buy transactions, especially compared with cost per impression or cost per click compensation schemes. In many situations, the Affiliate Network facilitates setting up the relationship between Brand and Publisher and is the clearing house for metrics and payments. Larger Brands may run programs without an Affiliate Network intermediary.

Setting up an Affiliate Marketing program makes sense for Brands that seek an incremental method to extend their distribution reach via trusted partnerships. Participating in affiliate marketing programs make sense if the Publisher is confident they can drive purchases and earn commissions.

Before You Begin with Affiliate Marketing …

It seems easy and low risk to join the affiliate economy. As with many things the model makes sense but reality can be very different. I have three pieces of advice for anyone looking to join an Affiliate Marketing program:

  1. First, build an audience. Without an audience and web traffic, it’s pretty tough to convert affiliate links into cash. So focus first on your audience by creating assets–content–that they value. Yes, you can deploy affiliate links starting on day one, but your ultimate affiliate marketing strategy may evolve as your audience evolves.
  2. Keep it relevant. Affiliate ads pay per action, which means that you get paid only when readers click on the ad and make a purchase. The more relevant the offer/link is to your site content, the higher the likelihood visitors will click on the ad and perform the desired action. If visitors don’t purchase, it is a win for the vendor (through their branded link or ad), but not for the Publisher.
  3. Assess each program’s value. There are lots of Brands offering affiliate programs, but not all affiliate programs are created equally. Read the fine print and make sure the compensation from the Brand is a fair exchange for promoting their products through your web site.
  4. Integrate offers wisely. Use site design to balance the core content with affiliate and other offers. Skew too far toward affiliate offers and your site looks like a NASCAR race car. Skew to far to content and you’re missing monetization opportunities. Use experiments wisely to find the optimal mix … but do it in a way that doesn’t ever scare away readers.
  5. Keep your “SEO Juice” to yourself. When adding affiliate links to your site, make sure to include rel=“nofollow” in the link tag. That way search engines will not automatically confer domain authority to the affiliate. You may also check out here the best website designs of 2022 according to WebCitz.

I’ve used DreamHost shared hosting since 2003. I’ve grown up with them. I’ve enjoyed extremely high service levels and I’ve even stayed with them through some ugly outages (they’re ancient history now). While you can always find a cheaper hosting provider in this highly competitive (dare I say cut-throat) business, DreamHost has earned my loyalty. DreamHost’s core shared hosting service is competitively priced, includes unlimited storage and bandwidth, includes a parade of new feature releases every month and is backed by honest and transparent customer service.

They’ve also offered an affiliate program forever. I’m just taking advantage of promoting in on my blog now.

Affiliate Marketing link: DreamHost Web Hosting

Sponsored Ad: Dreamhost (I am compensated if you register using this link. Thank you!)

My motivation is two fold. First, I want to understand how the Publisher side of affiliate marketing programs work. I’ve offered Google AdSense for some time on this blog (and made a modest return from it). Now I’d like to learn about another blog monetization channel. Second, I want the coin. Yes, I expect to profit from including DreamHost affiliate links on my site.

Click here (affiliate link) to sign up for DreamHost’s truly great shared hosting service.

How to Transcribe .MP3 Audio from Podcasts or .MP4 Movies to Text on Mac OS

 June 2017: a key component for these instructions is no longer actively maintained, so these instructions are no longer valid for Modern Mac configurations.

I listen to podcasts. I watch videos. I watch podcasts of different languages. But more than anything I read and write. I practice languages. That’s just how I roll.

Frequently I want to save an audio snippet or video clip for future reference. Sure I could save the source media file, if I had unlimited disk space. But what I usually do is keep a link to the original source and text synopsis of the snippet. That both saves on storage and makes future searches for that particular item simpler.

If you’re like me, you really want the original text more than a synopsis. It take s a bit of extra effort, but I have a nice solution that uses only a Mac and open source software. Read below for instructions on converting an MP3 audio file to a text document.

The Basics of Configuring Your Mac to Transcribe .MP3 Audio

Here’s what you need:

  • The original media (.mp3 file, for example)
  • Soundflower. Soundflower is an application that creates a virtual audio channel and directs audio input and output to physical or virtual devices.
  • Audacity. Audacity is a free application for recording and editing sounds.
  • TextEdit.app. TextEdit is the default text editor/word processor that is included in Mac OS X.

Follow the instructions on the developer websites to get all of the software installed and working on your system. Once you have the software installed, the next step is to configure your Mac to use Soundflower for dictation.

Transcribe mp3 audio: Dictation and Speech
  • Open System Preferences and click on  “Dictation & Speech”
  • Select the Dictation tab
  • Select “Soundflower (2ch)” as the dictation input source
  • Click Dictation to “On”
  • Tick the “Use Enhanced Dictation” box

Your Mac is ready for dictation. When dictation is turned on in TextEdit (or a another word processing app), your Mac will transcribe sound from the Soundflower input source.

Getting Your Audio and Text Files Ready

Next, you need to queue up the audio file in Audacity and direct output to Soundflower. For those who are new to Audacity, this will be the trickiest step. But relax, you don’t need to learn much about Audacity beyond deciding what section of sound to play and how to select the audio output from the default speakers to Soundflower.

Transcribe .MP3 Audio to Text - Audacity
  • Launch Audacity
  • Import your audio file into audacity (File–> Import, or simply drag the file into the center of the Audacity screen.)
  • Click the play button to give it a listen, then click stop once your confident you have the right sound clip/transcription area.
  • Choose Audacity –> Preferences –> Devices. Under playback, choose “Soundflower (2ch)” to switch the output from the onboard speakers to Soundflower. Click “OK”
Transcribe .mp3 audio: Audacity Preferences Dictation

With Audacity and your sound file queued up, its time to turn your attention to TextEdit.

  • Launch TextEdit
  • Create a “New Document”
  • You may want to add some meta data to the document, such as the podcast name, episode #, publish date and URL, to go along with the key transcript.
  • Position the cursor in the file where you want the transcript to appear.

And … Action!

It’s time to start audio playback and dictation transcription. Here both sequence and timing are important:

Transcribe .MP3 audio: Start Dictation
  1. In Audacity, move the scrubber start location 10-15 seconds before the key transcription area.
  2. Press “Play.” The scrubber and meters will start moving, though you won’t hear any sound. The audio signal is going to Soundflower instead of to the speakers.
  3. Put focus on Text edit and position the cursor where you want the transcription to begin.
  4. Select Edit –> Start Dictation. (or use the hot key combination, Fn Fn). A microphone icon with a “Done” button will appear to the left of your document.
  5. Text will start appearing in the document. It will likely lag by about 3-5 seconds.
  6. After approximately 30 seconds press the “done” button. Transcription will continue until complete.

This is the fun part: watch as transcription happens in real time right in the document window. Look Ma, no hands!

And now you have the original text (and most likely a few errors) as text to save. In the future you can easily search and retrieve the information.

An Excellent Alternative: Google Docs Voice Typing

While the solution above works great for offline work, one alternative with a lot of promise is Google Docs. The Voice Typing feature work much like the dictation service in Mac OS. It has the crowdsourcing advantages and privacy disadvantages of other Google products. If you’re OK with that, I found Voice Typing to do an very good job with accuracy and it can go longer that Mac OS dictation.

To use Google Voice Typing, follow all of the steps above with Soundflower, Dictation preferences and configuring Audacity.  Instead of using TextEdit, you’ll want to start the Chrome browser and create a Google Doc. Once you are in document, Select Tools –> Voice typing

Transcribe .mp3 Audio with Google Voice Typing

The user interface and process of starting and stopping transcription is the same as with TextEdit.

Dictation and Transcription Limitations

This process sets you well on you way to the goal of a high fidelity audio transcription. But it will be short of perfect. Here’s what you can do to go from good to perfect:

  • Understand that Mac OS dictation transcription works for a maximum of 30 seconds at a time. If you need longer, you may want to use an alternate technology such as Dragon.
  • Audio playback needs to start before dictation/transcription begins in TextEdit. TextEdit needs to be in focus for dictation to work. If you set the Audacity scrubber a few seconds ahead of target snippet, you’ll be fine.
  • Transcription cannot intuit punctuation. You’ll need to add that after the fact.
  • If you have multiple speakers or a noisy background, you may need to complete one additional step of creating a pristine audio file to work from. This can be done by listening to the sound through headphones and speaking the text into an audio recorder. Use the recording of your voice to drive the transcription.