Should You Use .svg Images in WordPress Posts?

Graphics make blog posts and web pages better. A picture is worth a thousand words—but including pictures on the web is harder than it should be. There is a whole alphabet soup of formats, graphic features such as transparency, different resolutions and the dreaded browser compatibility, find out more at this Kinsta blog post. Wouldn’t it be nice if creating and publishing graphics was as straight-forward as publishing text?

New and Improved: .svg or Scalable Vector Graphics

.svg images WordPress

.svg images in WordPress are here! This is the official .svg logo (in .svg format) served up from this blog’s media library using the Safe SVG plugin.

I’ve been tracking .svg for some time. .svg format stands for “scalable vector graphic,” which is described in a W3C specification. The format provides a modularized language for describing two-dimensional vector and mixed vector/raster images.

As of February 2017, .svg delivers numerous advantages for designers and developers alike. .svg images are supported by most browsers. The files are tiny compared to it’s .png and .jpeg brethren. And there are multiple tools, including my favorite graphic design tool, Sketch 3, that save files to the .svg format.

The advantages of .svg come from an industry standard format that comprises (1) vector graphic shapes (e.g., paths consisting of straight lines and curves), (2) raster images and (3) text that display beautifully in all modern browsers. In other words, the .svg image file contains instructions for rendering images at any resolution rather than compressed rasters. And for the designer and webmaster, this means you have a single tiny file to manage rather than exporting 1x, 2x and 4x versions from a graphic tool which need to be managed in a CDN or media library and delivered to desktop, mobile and retina displays based on the viewport setting…very, very complex.

With the advantages of broad compatibility, tiny files and simplicity, it’s time to make a switch. Or is it?

.svg Images in WordPress…Not For the Masses…Not Yet

As of February 2017, WordPress doesn’t officially support .SVG images. Sure it’s easy to enable SVG in your WordPress instance through a function or a plugin. But if it’s easy to support the .svg image format, why isn’t support included in WordPress core?  The answer: security.

It turns out that the .svg format is more of a document format than an image format. That means you can embed all sorts of things in a .svg file. This includes JavaScript. So that seemingly benign graphic could easily contain a not-so-benign script that hijacks visitors, data and web experiences. Not so good. And with 25% of the web running on WordPress, the core development team prioritizes security and reliability over simplicity. The four years of engineering debate is visible to all in WordPress Trac ticket 24251.

.svg Images in Controlled WordPress Sites: Bring On .svg!

In sites where only skilled web designers and publishers with a strict file chain of custody procedure, the advantages of .svg can be realized today. For security, I strongly recommend that you think twice about deploying .svg support by hacking the functions.php file and or using the less secure plugins that you can easily find in the WordPress Plugin Directory.

Instead, focus first on training and procedures to mitigate potential risks from .svg. Just as you wouldn’t let anybody upload JavaScript to your site, you shouldn’t let just anyone upload .svg files to your site. The first and safest approach is to let savvy designers include .svg files in theme assets:

  1. Produce your own .svg files or review code in files provided by others
  2. Run the .svg file through a sanitizer, like DOMpurify
  3. Save the resulting code locally.
  4. Add the .svg file to your CDN or production file system
  5. Directly reference the sanitized file with CSS or HTML code <img src="/blah/file.svg" />

How About Media Libraries?

Enabling the media library opens more risk. If you are ready to limit access to the media libary using WordPress user roles, the risks should be manageable. There is one .svg plugin I can recommend today: Safe SVG by Daryll Doyle. It not only enables the .svg mime type for the media library, but it sanitizes .svg files on upload. The plugin is young but works. And developer Daryll Doyle is actively developing Safe SVG. He deserves our support!

.svg has a bright future for web publishers who value great user experiences with content and compatible graphics files that are simple to manage. Let’s embrace a secure future for SVG and WordPress.
How to Transcribe .MP3 Audio from Podcasts or .MP4 Movies to Text on Mac OS

 June 2017: a key component for these instructions is no longer actively maintained, so these instructions are no longer valid for Modern Mac configurations.

I listen to podcasts. I watch videos. I watch podcasts of different languages. But more than anything I read and write. I practice languages. That’s just how I roll.

Frequently I want to save an audio snippet or video clip for future reference. Sure I could save the source media file, if I had unlimited disk space. But what I usually do is keep a link to the original source and text synopsis of the snippet. That both saves on storage and makes future searches for that particular item simpler.

If you’re like me, you really want the original text more than a synopsis. It take s a bit of extra effort, but I have a nice solution that uses only a Mac and open source software. Read below for instructions on converting an MP3 audio file to a text document.

The Basics of Configuring Your Mac to Transcribe .MP3 Audio

Here’s what you need:

  • The original media (.mp3 file, for example)
  • Soundflower. Soundflower is an application that creates a virtual audio channel and directs audio input and output to physical or virtual devices.
  • Audacity. Audacity is a free application for recording and editing sounds.
  • TextEdit.app. TextEdit is the default text editor/word processor that is included in Mac OS X.

Follow the instructions on the developer websites to get all of the software installed and working on your system. Once you have the software installed, the next step is to configure your Mac to use Soundflower for dictation.

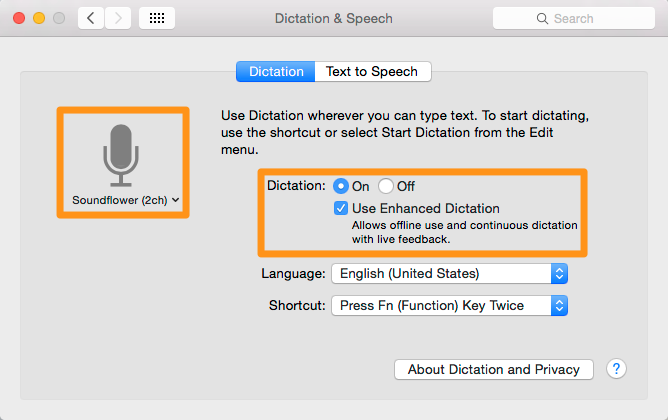
Transcribe mp3 audio: Dictation and Speech
  • Open System Preferences and click on  “Dictation & Speech”
  • Select the Dictation tab
  • Select “Soundflower (2ch)” as the dictation input source
  • Click Dictation to “On”
  • Tick the “Use Enhanced Dictation” box

Your Mac is ready for dictation. When dictation is turned on in TextEdit (or a another word processing app), your Mac will transcribe sound from the Soundflower input source.

Getting Your Audio and Text Files Ready

Next, you need to queue up the audio file in Audacity and direct output to Soundflower. For those who are new to Audacity, this will be the trickiest step. But relax, you don’t need to learn much about Audacity beyond deciding what section of sound to play and how to select the audio output from the default speakers to Soundflower.

Transcribe .MP3 Audio to Text - Audacity
  • Launch Audacity
  • Import your audio file into audacity (File–> Import, or simply drag the file into the center of the Audacity screen.)
  • Click the play button to give it a listen, then click stop once your confident you have the right sound clip/transcription area.
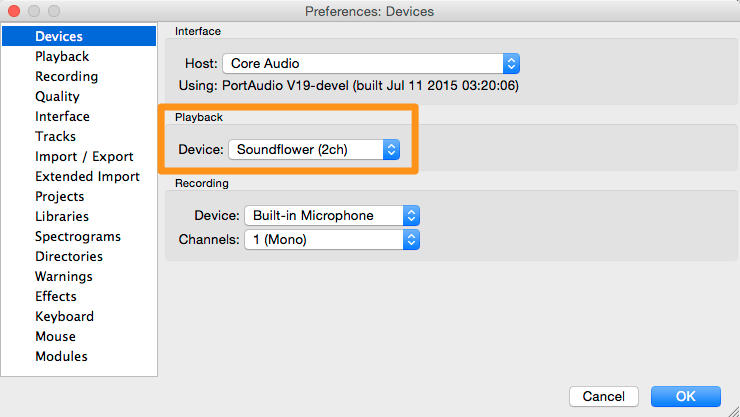
  • Choose Audacity –> Preferences –> Devices. Under playback, choose “Soundflower (2ch)” to switch the output from the onboard speakers to Soundflower. Click “OK”
Transcribe .mp3 audio: Audacity Preferences Dictation

With Audacity and your sound file queued up, its time to turn your attention to TextEdit.

  • Launch TextEdit
  • Create a “New Document”
  • You may want to add some meta data to the document, such as the podcast name, episode #, publish date and URL, to go along with the key transcript.
  • Position the cursor in the file where you want the transcript to appear.

And … Action!

It’s time to start audio playback and dictation transcription. Here both sequence and timing are important:

Transcribe .MP3 audio: Start Dictation
  1. In Audacity, move the scrubber start location 10-15 seconds before the key transcription area.
  2. Press “Play.” The scrubber and meters will start moving, though you won’t hear any sound. The audio signal is going to Soundflower instead of to the speakers.
  3. Put focus on Text edit and position the cursor where you want the transcription to begin.
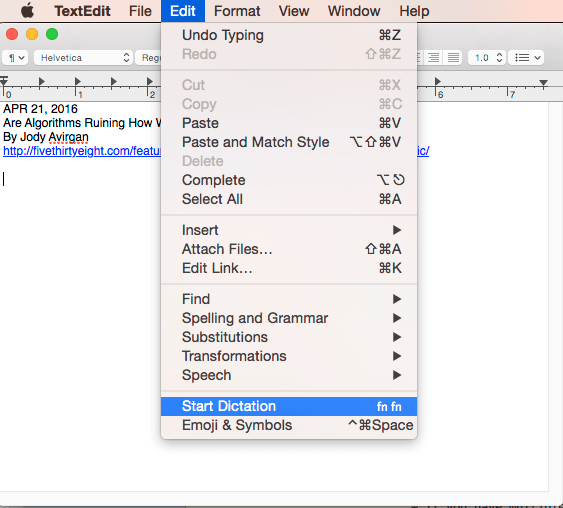
  4. Select Edit –> Start Dictation. (or use the hot key combination, Fn Fn). A microphone icon with a “Done” button will appear to the left of your document.
  5. Text will start appearing in the document. It will likely lag by about 3-5 seconds.
  6. After approximately 30 seconds press the “done” button. Transcription will continue until complete.

This is the fun part: watch as transcription happens in real time right in the document window. Look Ma, no hands!

And now you have the original text (and most likely a few errors) as text to save. In the future you can easily search and retrieve the information.

An Excellent Alternative: Google Docs Voice Typing

While the solution above works great for offline work, one alternative with a lot of promise is Google Docs. The Voice Typing feature work much like the dictation service in Mac OS. It has the crowdsourcing advantages and privacy disadvantages of other Google products. If you’re OK with that, I found Voice Typing to do an very good job with accuracy and it can go longer that Mac OS dictation.

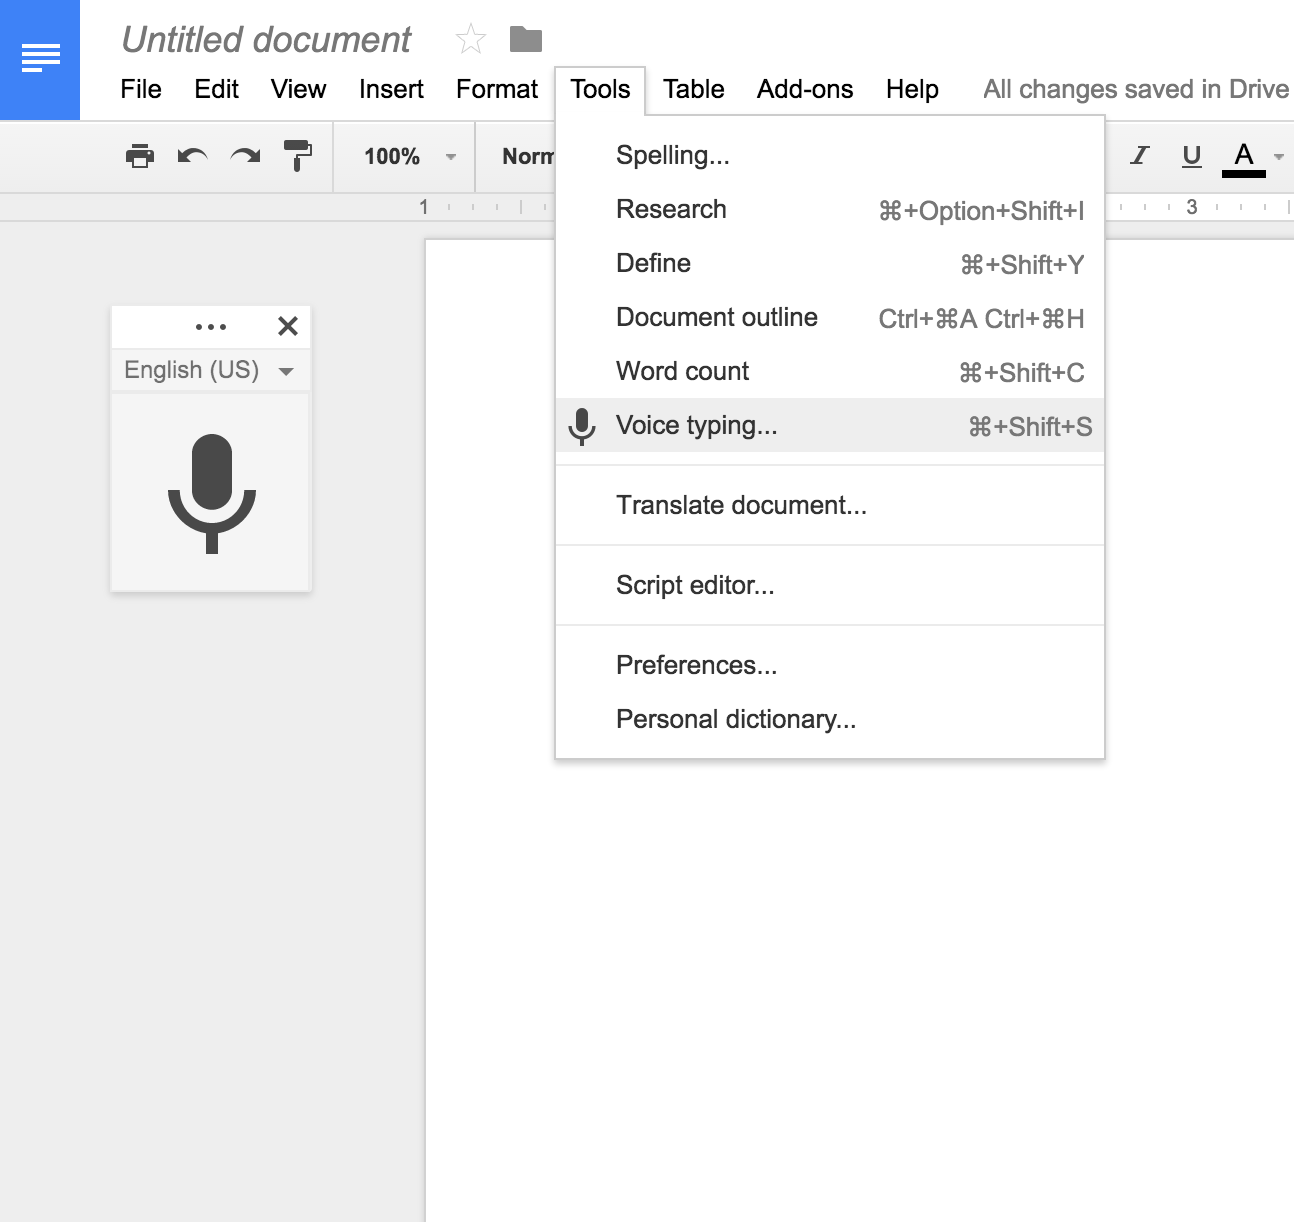
To use Google Voice Typing, follow all of the steps above with Soundflower, Dictation preferences and configuring Audacity.  Instead of using TextEdit, you’ll want to start the Chrome browser and create a Google Doc. Once you are in document, Select Tools –> Voice typing

Transcribe .mp3 Audio with Google Voice Typing

The user interface and process of starting and stopping transcription is the same as with TextEdit.

Dictation and Transcription Limitations

This process sets you well on you way to the goal of a high fidelity audio transcription. But it will be short of perfect. Here’s what you can do to go from good to perfect:

  • Understand that Mac OS dictation transcription works for a maximum of 30 seconds at a time. If you need longer, you may want to use an alternate technology such as Dragon.
  • Audio playback needs to start before dictation/transcription begins in TextEdit. TextEdit needs to be in focus for dictation to work. If you set the Audacity scrubber a few seconds ahead of target snippet, you’ll be fine.
  • Transcription cannot intuit punctuation. You’ll need to add that after the fact.
  • If you have multiple speakers or a noisy background, you may need to complete one additional step of creating a pristine audio file to work from. This can be done by listening to the sound through headphones and speaking the text into an audio recorder. Use the recording of your voice to drive the transcription.

The Full List: 23 Varieties of Successful Web Conversion Offers

Your website should deliver your highest value and lowest cost business leads. People who find your site are interested in your business. People who stay on your site are engaged and developing trust. People who fill out a form on your site, sharing their contact information in exchange for something of value, are gold.

Web Conversion Offers

To mine gold, your web site needs to offer two things:

  • One or more registration forms
  • Relevant content that visitors want

Below is the full list of 23 successful web conversion offers, sorted by category:

Information Downloads

  1. White papers
  2. Tip sheets
  3. Software
  4. Apps

Registrations

  1. Webinar sign-up
  2. Cloud account on your site
  3. Trial request

Activities

  1. ROI calculator
  2. Webinar attendance
  3. Meet-up attendance
  4. Hack-a-thons
  5. Software usage

Subscriptions

  1. Newsletter signup
  2. Mailing list signup
  3. Blog or podcast RSS subscription
  4. Social media “like,” “follow” or “channel subscription”

Access

  1. Contact us
  2. Request a demo
  3. Meeting request
  4. Free consultation
  5. Contest entry
  6. Claim a discount
  7. Inbound call to sales

Picking offers for your business is a very important decision and should flow naturally from your marketing strategy. One size doesn’t fit all. A free trial may make sense for a software developer but not for a business decision-maker. Make sure you have content for all potential buyers.

Keep one more thing in mind: conversions happen in the buyer’s mind and only gets measured on your web site. To earn a conversion, you first need to prove that your business is trustworthy, honest and helpful.

What’s Not on the Web Conversion Offers List

The following types of helpful web content are not listed as conversion offers because it should just be freely available. Somethings, even some valuable things, you just need to share freely. Make the following content freely available to inform, engage and build customer trust:

  1. Product specs and data sheets
  2. Announcements and press releases
  3. Customer success stories
  4. Endorsements
  5. Infographics
  6. Sizzle videos

Are you using other types web conversion offers to generate leads? Share below!

This Novice Built a Responsive WordPress Theme in a Day—And So Can You

Screenshot of article in responsive wordpress theme

A post from Bill Freedman’s Soon to be a Major Trend viewed from an iPhone using the new WordPress Responsive Theme

How cool is it that a marketing leader and data nerd with modest web development skills can, all by his lonesome, bring a WordPress blog/website into the modern era in under a day? That’s just what I did.

I’m pretty darn happy with the new look of Bill Freedman’s Soon to be a Major Trend. I started this site in 2006 when table layouts were the bomb. My last major change was in 2008 when I started using the MistyLook theme by Satish. Browse through the pages and posts. Read the articles and view the images. Leave comments. Did you have a good experience with my spiffy new theme and the pre-existing content? Did you find something I should fix? Please leave comments below.

I’m amazed at how little effort was needed for browser and platform accommodations in this era of fragmented computing platforms. This site with its Responsive WordPress Theme looks good to me on an Android phone, a Windows PC, an iPad as well as a MacBook Pro running Chrome  that was used for “development.”

Responsive WordPress Theme Development Shout-outs

While the make-over only consumed about a day of my labor, my success clearly benefited from the innovation, creativity and contributions from many others. As Isaac Newton said, “If I have seen further it is only by standing on the shoulders of giants.” I’d like to give heart-felt shout-outs to a number of sturdy-shouldered giants who saved me time, effort and frustration:

  • WordPress—It was a great piece of software when I got started blogging in 2006, and I’ve been a user and trusting fanboy ever since. WordPress has become an incredible content management system (CMS) backed by an industry and ecosystem devoted to helping the world create flexible web sites. The platform has evolved to support HTML5, CSS3, responsive design, security, scalability and a whole lot more. All this without making me edit my previously created content.
  • Automattic—The commercial sponsor of WordPress contributed to my site in countless ways, from sponsoring development of core WordPress features to essential plug-ins like Akismet to driving standards in theme development.
  • Ian Stewart—The original Theme Shaper and now an Automattic employee. I found Ian’s Thematic framework in 2008 and have been learning from him ever since. While I’m not a PHP coder or theme developer, his well-commented themes and blog posts taught me that themes matter. While I didn’t dabble with the latest in themes on this site, my clients’ sites benefited from his contributions, teachings about functions and child themes, and now from Underscores (_s), which is the starter theme for this site.
  • Anonymous Media Query Author—Somewhere at sometime I found a set of WordPress- and _s-ready media queries. I don’t remember who wrote this code. I hope I’m not violating your license. I just added the media queries to my style.css file and—poof—my site was responsive.
  • Yoast—Joost de Valk and the Yoast team have created numerous reliable plug-ins and training that help my content get found. It’s not enough to have a pretty and responsive WordPress theme. Your site and content needs to be found, read and responded to. WordPress SEO by Yoast helps the SEO and writing process for authors and does the behind the scenes work to make your content irresistible to Google and Bing.
  • Font Awesome—I’m a fan of this set of well designed icons and happy to include them as a core part of my new look and feel. The style sheet and plug-in (by Rachel Baker) made integration of the icons-as-font easy. I also like that the associated .pdf enables me to use the icons as scalable images in derivative works.

I could go on. But rather than blindly take my recommendations, just get started with updating your own theme. One piece of advice: don’t do theme design on your production blog. Do it on a local WordPress instance, which isn’t that hard to set up and manage. All you really need are some free tools, intermediate knowledge of CSS3 and comfort configuring advanced things on your desktop. I have a Mac, so I’ll help you out with tools for Mac:

  • A MAMP stack-Mac OS, Apache, MySQL and PHP-to run WordPress. One preconfigured download is MAMP.
  • A MySQL admin tool to export/import your content between production and development. I use SequelPro
  • A text editor. I like Sublime Text which isn’t free. TextWranger is a good choice that’s free.
  • An FTP browser. My choice is Cyberduck.
  • WordPress
  • A starter theme. I used Underscores.

Perhaps you’ll go the Underscores route as I did or perhaps you’ll purchase a ready-to-use responsive WordPress theme. It doesn’t matter. Get your site onto the WordPress platform and take advantage of the wealth of resources that can take your site from good to great.

Ideas in the Social Media Era: I’ll Get It Right the 5th Time

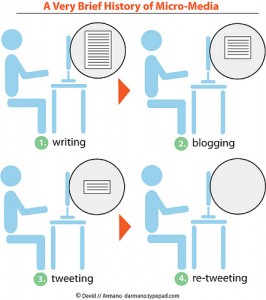
I love this chart. Not only is it funny, it gets to the core of how the social media era is disrupting creativity.

The chart puts its focus on article length (and perhaps the quantity of postings and/or impressions). The chart is silent on quality.

Great ideas have always been distilled to their essence through pity catchphrases. With social media, any idea, even before it’s refined (let alone great) is distilled for social network impact. The network for disseminating ideas is becoming more powerful than ideas themselves.

This is a new challenge for the creator and innovator. When is an idea ready to be published? What are readers’ expectations for quality and accuracy of new ideas? Does it help or hurt your reputation to publish many unrefined ideas? Is your idea sharing risk tolerance dependent on the size and nature of your social network? Are facts and accuracy destined to become endangered species during the social media era?

I don’t know, but I’m going to publish this now and refine it later. My sense of optimism suggests that we’ll muddle through.

Earning a Handshake 2.0

Building trust starts with the first web visit and with the first impression of your brand.

Such is the idea behind “2.0” thinking. Products, services and brands now have “online,” “interactive,” and “collaborative” elements so that consumers and users play an active, anonymous and early role in creating relationships with vendors. Twitter, Facebook and Wikipedia are halmarks of Web 2.0 success.

handshake 2.0In the olden-days of Handshake 1.0, a handshake was a precursor of bilateral communication. A protocol of acknowledging a peaceful relationship and mutual trust with the idea of building upon the status quo. An initial meeting between a vendor and a prospective customer. A politician building a coalition. A suitor wooing a debutante. Two or more people carve out a sacred space for a live interaction in the hopes of a mutually satisfactory outcome. Stakes are reasonably low with a first handshake; and the budding relationship can quickly go in any direction. Compare this to two people who pass in the street with nothing more than a glance. No rapport. No communication. No goals for advancing an agenda.
The Internet meets Humanity: Handshake 2.0

With that introduction, I’d like to introduce the new concept of—taa daa—Handshake 2.0. As we have more and more interactions online (defined and measured through web visits, cookies and registration forms) there is a new process for establishing bilateral communication. No outreached hand. No touch. No real-time conversation. No progress or even an action plan. Just a web site that seeks rapport and a visitor who is willing to offer personally identifiable information. It’s easy for users to navigate away. But it’s also human to hope that each visited site succeeds at fulfilling the information hunt.

What is interesting is what happens next: a fast exit or an attempt at rapport building. Credibility and effective design by the site owner conspires with desire and perhaps laziness by the visitor to earn a second and a third click.

Like with off-line interactions, there are false-starts and bad first impressions in the online world.

At this point the the user (and laser-focused vendors) chooses whether s/he will try to extend the anonymous glance into rapport and ultimately into a Handshake 2.0. This is so very different than the past. Information collection required numerous human interactions. Now, anonymous web surfers can learn and make some initial decisions without consulting another human. Likewise, the human managers of web sites can look at analytics reports, IP addresses and email domains to determine if the prospect warrants attention.

Creating The Conditions for Handshake 2.0

I argue that earning a Handshake 2.0 is the first job of a web site in the Web 2.0 era. It may not happen on the first day you launch a web site. And the web presence frequently need to be forged with the help of outside forces…reputation, brand, economic forces and individual behavior. So what attracts (and alternatively repulses) visitors from choosing to grant a Handshake 2.0:

Earning a Handshake 2.0 Raising Doubts
  • Hygienic design
  • Empathy
  • Relevance
  • HTML accuracy
  • Browser compatibility
  • A way to offer a Handshake 2.0
  • Jarring or amateurish design
  • Out-of-date information
  • Breaking web conventions
  • Overstepping trust
  • Any of many kinds of errors
  • Asymmetry…asking but not giving

Following the principles above will result in more and faster Handshake 2.0s. Supplementing your web site with other rapport-building tactics makes sense too. This is why marketers are looking for any and every way to build relationships. Facebook, Twitter, MeetUps are the new tools which have earned a place beside reliable standards: press releases, trade shows, advertising and good ole salesmanship.

Did this article make you think? Leave a comment!